- Brand Name: Waveshare
- Demo Board Type: ARM
- Certification: NONE
- Origin: CN(Origin)
I Product Description
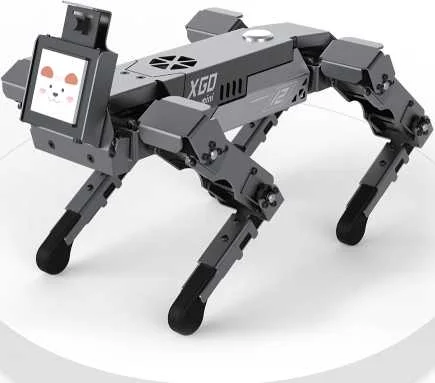
XGO-mini is a desktop AI robot dog with 12 DOFs inlaid with Kendryte K210 chip for AI edge computing applications. It supports omni-directional movement, 6D posture control, posture stability, and multiple sports gaits, internally equipped with 9-axis IMU, joint position sensors and current sensors to feed back its own postures, joint rotation and torque for internal algorithms and secondary development. The robot dog allows for graphic and python programming on APP or PC, so as to develop AI applications.
II Product Data and Components
Product Data
Model: XGO-mini Programmable Robot Dog
Dimensions: 250x150x60mm
Weight: 700g
Battery: 7.4V 2500mAh lithium battery
Material: Body-1.5mm aviation aluminum Legs-Silicone & Nylon
Processor: K210+STM32
Screen: 240*240 pixel full-color LCD
Camera: 0.3 mega pixels OV2640
Storage: 4G SD card
Charger rated input: 100-240V~50-60Hz
Charger rated output: 8.4V 1A
Product Components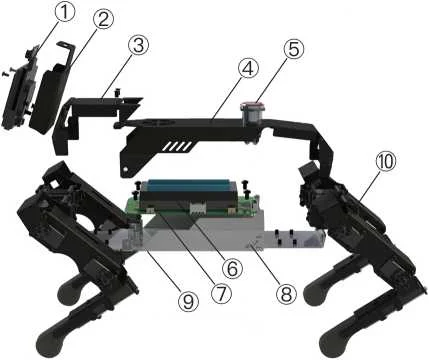
①AI module
②AI module bracket
③Front cover
④Back cover
⑤Self-locking switch
⑥18650 2S battery
⑦Core drive board
⑧Bottom cover
⑨Charge jack
⑩Metal high-speed magnetic encoding bus steering mechanism
III About AI Module
As the master control module for AI-related applications, the AI module comes with the features of basic computer vision recognition and machine learning model inference, which can facilitate the entry and advanced-level AI applications.
AI module
(1)Built-in Kendryte K210 chip, featured RISC-V processor architecture, audio-visual, standalone IP core and strong programmability.
(2)Support images, audio, video, machine learning models and other types of materials stored in a Micro SD card;
(3)The integrated camera module jack is used for front shooting.
Screen module
(1)The integrated camera module jack is provided for rear shooting;
(2)1.54’’ LCD full-color screen can display pictures in JPG, BMP and other formats;
(3)External 2.5mm audio interface;
(4)Onboard power amplifier chip and speaker, support the playback of audio files in WAV format.
Camera module
The AI camera resolution is 0.3 mega pixels and can be plugged into the screen module or AI module, functioning as front or rear camera.
IV Key Technologies
IMU posture self-stabilization
Based on the attitude data obtained from IMU and with closed loop control, the robot dog can stay stabilized no matter how the surface shakes.
**6 DOFs posture control **
With foot tips fixed, the whole body is under 6 DOFs motion control.
IMU posture smoothing
Based on the attitude data obtained from IMU and with closed loop control, the robot dog can adapt to external force and adjust to target posture of hand motion, so that it can deliver demo teaching.
User communication and secondary programming interface
The open-access underlying serial port protocol applies to secondary development and verification.
Motion gait planning
Low, medium and high posture which the robot dog comes with is linked to three different speeds, appropriate gait strategies and rules are applied.
Kinematics and dynamics simulation interface
In the ros scenario, kinematics and dynamics simulations are conducted on rviz and gazebo platforms.
Omni-directional motion control
With 12 active joints and through kinematics decoupling, the robot dog can realize the omni-directional omotion of forward shift and rotation and support the superposition of motions from different directions.
AI
Machine vision, face recognition, speech recognition, model training and other AI functions.
V Learning Contents
Mechanics:Motor and drive
Composed of micro-sized servo unit structure, 6 DOFs motion analysis ,Single-leg 3 DOFs motion analysis
Motion:Motion and drive
Derived forward and inverse kinematics, complete Cartesian space control and joint space control
Sensing:Gyroscope + acceleration + magnetometer
The joint position and speed of the robot dog, Torque (current) and other sensors
Control:Control theory and control planning
PID control, trajectory planning control, space posture stability control
Intelligence:Robot dog intelligence
Machine vision, speech recognition, face recognition,Face detection and color recognition and other AI skills
Simulation:Simulation practice
Kinematics and dynamics simulation
– How to use –
I Operation Instructions
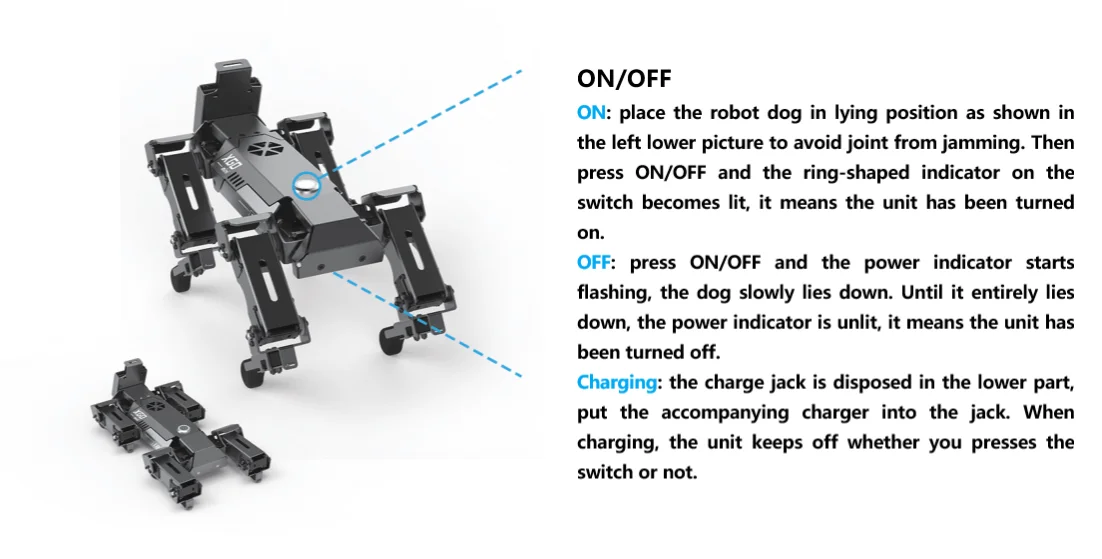
I Illustration
1.preparation
Spread the XGO and press the power button, the machine dog enters the default standing initial state, when the screen appears as shown in the figure below.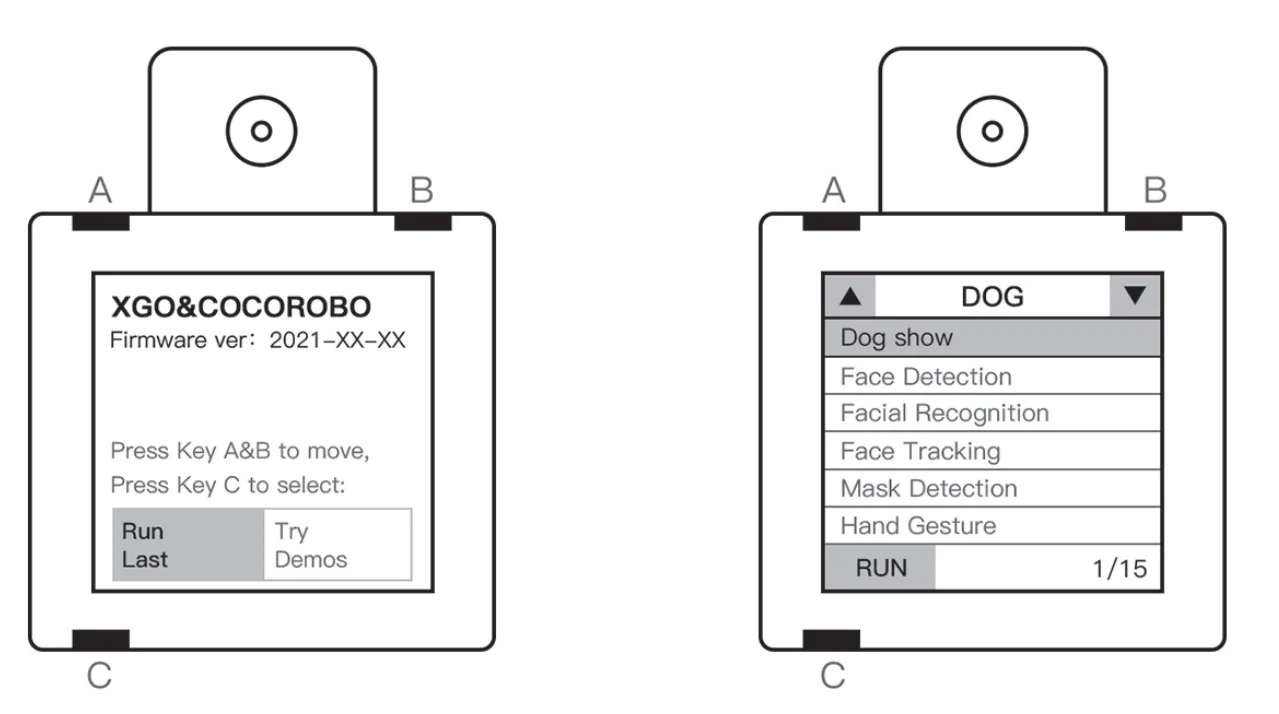
There are 4 information in the initial interface to master, and the position of the A, B and C keys on the module is shown in the figure above.
(1) Firmware version: It indicates the firmware version number of the current AI module, and you can download the latest version of the firmware and tools on the official website.
(2) Operation instructions: A and B keys control interface menu options switch, C key indicates the confirmation operation, extended press C to exit the current program.
(3) Run the last program: When you upload the program to the AI module, you can choose this option to let the AI module run the latest upload program;
(4) Try the Sample program: Select this option to go to the next interface and experience the sample program stored in the SD card of the AI module.
2. Select the sample program and experience it
According to the initial interface instructions, the operation module enters the attempt sample program interface, and the key order should be: B->C.The operation keys of the sample program list interface are the same as the initial interface. There are 3 information to master.
(1) Type of sample program: the sample program is divided into visual and speech classes.
(2) Sample Program List: The selected sample program has a white box and the name appears;
(3) the sample program number: There are 17 sample programs for this firmware version, the number on the left side of the slash is the serial number of the selected sample program, and the number to the right side of the slash is the total number of the sample program.
The same as the initial interface, we use A, B, C keys to operate the sample program list interface:
A : Up sample program, B : Next sample program / page turning
C : Select the sample program and load, extended press C : Exit the sample program to the main menu.
3.Sample Program
|
serial number |
sample program |
Function and operation introduction |
|
1 |
Dog Show |
go to the program, the screen module will roll on EMOJI and the robot dog enters the show mode (to execute a plurality of actions). |
|
2 |
Face Detection |
go to the program, the AI module will detect a face in the picture. If a human face is detected, the screen module will frame out the face in the picture by a rectangular box, and the robot dog makes handshaking action. |
|
3 |
Facial Recognition |
go to the program, the AI module can recognize, frame out a face and mark key points; press “B” to take picture and mark it as “master”, up to 3 pictures of the human face can be taken, mark as “master”, “friend1”, and “friend2” respectively. Once the camera re-captures the face that has been marked, the frame will turn green and show the mark and confidence level (to what extent the face is exactly as marked). If the face marked as “master” is recognized, the robot dog will rotate around three axes. |
|
4 |
Face Tracking |
go to the program, the AI module will execute face recognition. Referring to the face position in the picture, the robot dog will automatically align the center of the screen to the face, until the face following effect is attained. |
|
5 |
Mask Detection |
go to the program, the AI module will execute mask defection and identify whether the figure in the picture is wearing a mask or not; if there is no mask detected, the figure will be framed out in red box with the confidence level of detection indicated, and the robot dog will make head-shaking action; if there is a mask detected, the figure will be framed out in green box with the confidence level of detection indicated, and the robot dog will make head-nodding action; if the confidence level of detection is less than a given value, then the figure will be framed out in blue box. |
|
6 |
Finger Guessing |
go to the program, the module recognizes the hand in the picture, and depending on the different gestures of the hand, the machine dog shows the machine dog guessing victory pictures.(In order to improve the identification accuracy, please try to ensure the simple background and sufficient light when using.) |
|
7 |
Hand Gesture |
go to the program, the module will identify the hand in the picture, and according on the different gestures of the hand, the machine dog will make different movements.The e. g. gesture-action; fist-turn ring; refuse-lie down; scissor hand-three-axis linkage; number 6-wave; ok-sit down.(In order to improve the identification accuracy, please try to ensure the simple background and sufficient light when using.) |
|
8 |
Hand Tracking |
go to the program, the AI module will execute hand recognition and can recognize, frame out the hand. Referring to the hand position in the picture, the robot dog will automatically align the center of the screen to the face, until the hand following effect is attained. |
|
9 |
Traffic sign Detection |
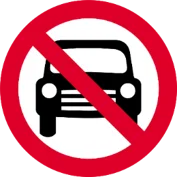
go to the program, the module begins to identify the traffic signs. The identifiers include: “Go straight”, “Stop”, “No entry” and “Park” (the logo can see 1. Traffic signs below); After the identification, the machine dog will perform the corresponding actions: forward, standing, back and sit down. |
|
10 |
Traffic light Detection |
go to the program, when the module recognizes the green light, it will be identified on the screen with a green sign, and the machine dog begins to go straight; When the module recognizes the red light, it will be identified with a red sign on the screen, and the machine dog stops moving. |
|
11 |
Image Classification |
go to the program, the AI module will recognize common objects. Once recognized, the common object will be framed out in the picture with the name of the recognized object marked; if no object is recognized, “Nothing Detected” will be prompted. In addition, when the identified object is “person”, the robot dog will execute swaying action; when the identified object is “dog”, the robot dog will execute peeing action; when the identified object is “act”, then the robot dog will rotate around three axes. |
|
12 |
Bone Recognition |
go to the program, the screen will prompt for taking picture of a bone, press “B” to take pictures of the bone (5 pictures), then the screen will prompt for taking pictures of the vegetable, press “B” to take pictures of the vegetable (5 pictures). After sampling, the AI module will recognize the bone and vegetable. When a bone is recognized, a marking will appear on the screen and the robot dog executes food-finding action; when a vegetable is recognized, a marking will appear on the screen and the robot dog executes standing action. |
|
13 |
Regional Color Analyze |
go to the program, colored area blocks will appear in the center of the screen, and the color value and blocks in the area will be displayed on the top of the screen. |
|
14 |
Learn & Find Color |
go to the program, start auto capturing and learning the color of the center area on the current screen (the display lasts for about 2 secs); subsequently enter the tracking stage, the area appearing the similar color as the learning content on the screen will be detected and marked. |
|
15 |
Track Square |
go to the program, the module will recognize the color block (pure color block) in the picture, and will adjust their position according to the color block and their own relative position.(The brighter the color block, the better) |
|
16 |
Find QR Code and Decode |
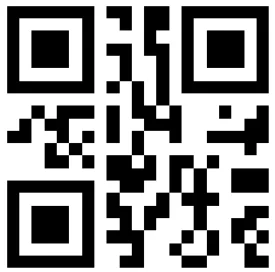
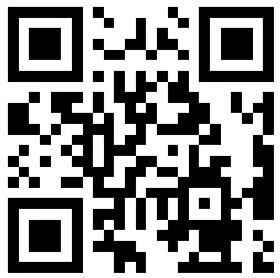
go to the program, when a QR code appears on the screen, the module will mark it and display the decoded text content on the top. If the text is a specific command statement (see 2. QR code below), then the machine dog performs the corresponding action. |
|
17 |
Speech Recording |
After entering the program, start recording. Each audio needs to be recorded three times. The following words need to be recorded in order:”Eat”,”Hand”,”Turn”,”Down”,”Sit”,”Bye” |
|
18 |
Speech Recognition |
After entering the program, the module starts to recognize the audio and makes different actions according to the recognized audio |
|
19 |
Sound Spectrum Analyze |
go to the program, the screen module will display the audio acquired by microphone, and the robot dog will execute an action in line with the audio. More details are described below: when low sound is acquired (framed out in red circle), the robot dog will execute lying action; when low-to-mid sound is acquired (framed out in green circle), the robot dog will execute stretching action; when mid-to-high sound is acquired (framed out in blue circle), the robot dog will execute sitting action; when high sound is acquired (framed out in purple circle), the robot dog will execute standing action. |
4.Sample images for program
(1) Traffic sign image
-Traffic sign image-
|
Num |
Image |
Action |
|
1 |
|
Forward 2 seconds |
|
2 |
|
Lie down |
|
3 |
|
Back off |
|
4 |
|
Sit down |
(2) QR code image
-QR code image-
|
Num |
decoded text |
QR code |
Action |
|
1 |
hello |
|
Wave |
|
2 |
sit down |
|
Sit down |
|
3 |
go forward |
|
Forward 2 seconds |
|
4 |
go backward |
|
Back off 2 seconds |
|
5 |
turn left |
|
Turn left |
|
6 |
turn right |
|
Turn right |
|
7 |
show |
|
Dog show on |
III Mobile Terminal.
1. summary
This software is a robot controller developed by Luwu Intelligence. The software connects Bluetooth and robot through mobile phones to data communication, providing users with convenient and simple remote control interface and a variety of other control methods, and greatly facilitates users’ control of the robot.
The software can be used without login, after installed search and match robot equipment and identify the types of robots.
The software is generally divided into four parts: Main page, Bluetooth interface, Setup interface and Control interface.The portal to other interfaces is provided on the home interface; interactive function with Bluetooth connection of the robot; the setting interface provides options to change APP settings; and the control interface provides a variety of remote control functions.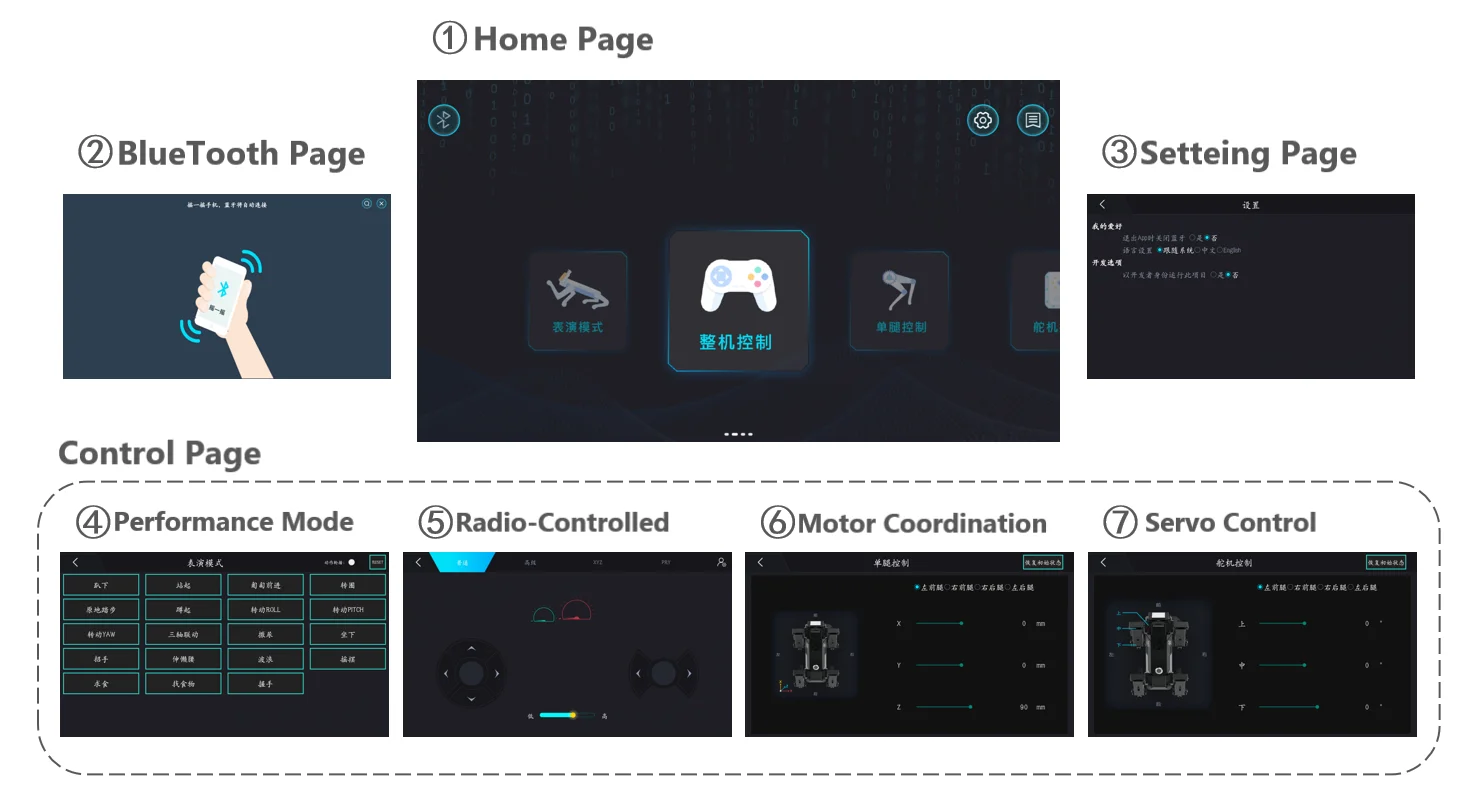
Software is suitable for mobile phones above Android 4.4 (including) systems.
2.Detailed module solution
2.1.Home page
Click on the software icon, and enter the APP.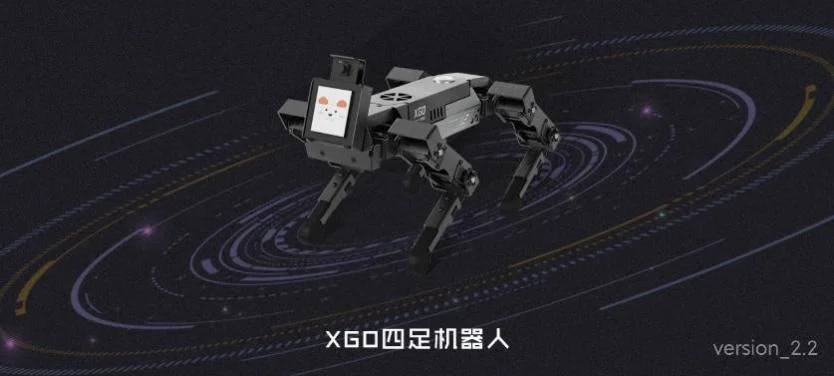
First of all, users will see the welcome interface as the picture above, the interface background picture is the Luwu intelligent mini version of the quadruped robot, but also shows the version number of the current software.The welcome interface lasts for 3 seconds and goes to the home page.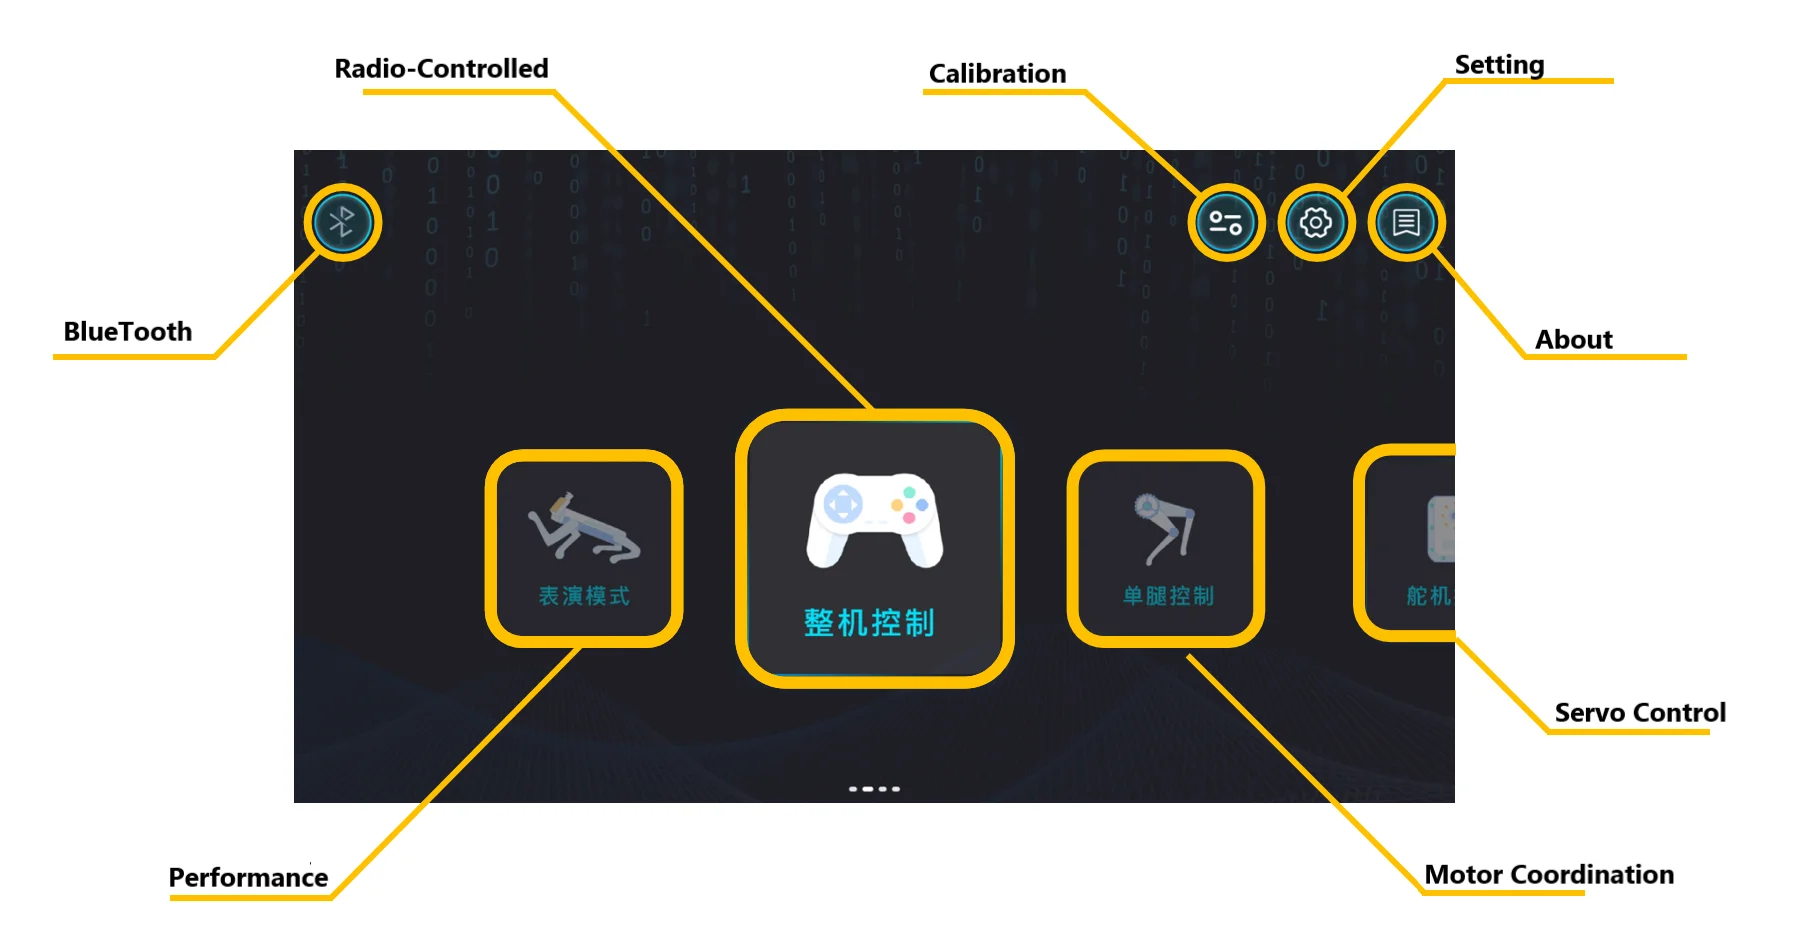
The main page provides access to the other interfaces, as shown above, as described below:
1)Bluetooth: If there is no robot device connected at this time, click the Bluetooth button will enter the Bluetooth connection interface, you can search and connect the robot device.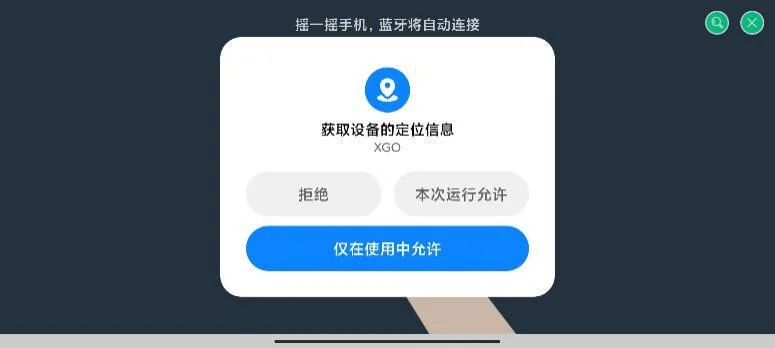
Note: Bluetooth of the mobile phone is needed here. On opening for the first time, the user needs to authorize the corresponding permission of the APP, otherwise the Bluetooth function will not be used normally.When entering the Bluetooth connection interface, if the phone Bluetooth is not open, the user will be prompted to open Bluetooth, otherwise the function will not use Bluetooth normally.
The Bluetooth connection interface is shown in the figure below.Shake the phone, and the APP will automatically connect to the nearest robotic device.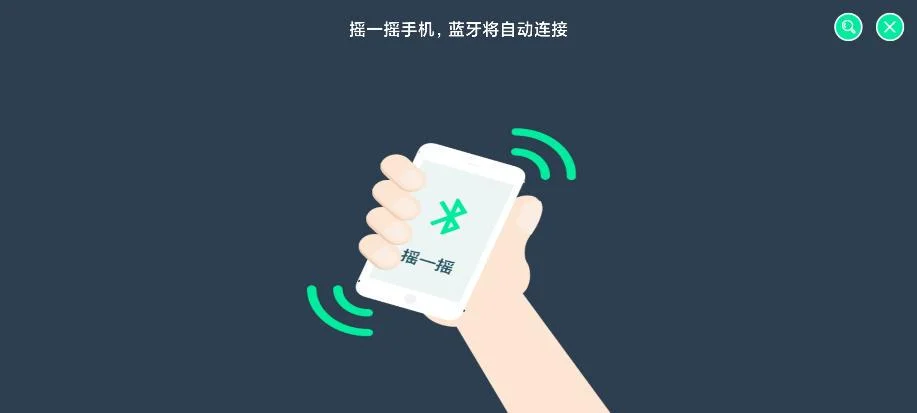
If there are multiple devices nearby or users want to connect the device through the robot name, click the search button, after a period of search, all available devices nearby will be listed, as shown in the figure below, click a device name to connect the device.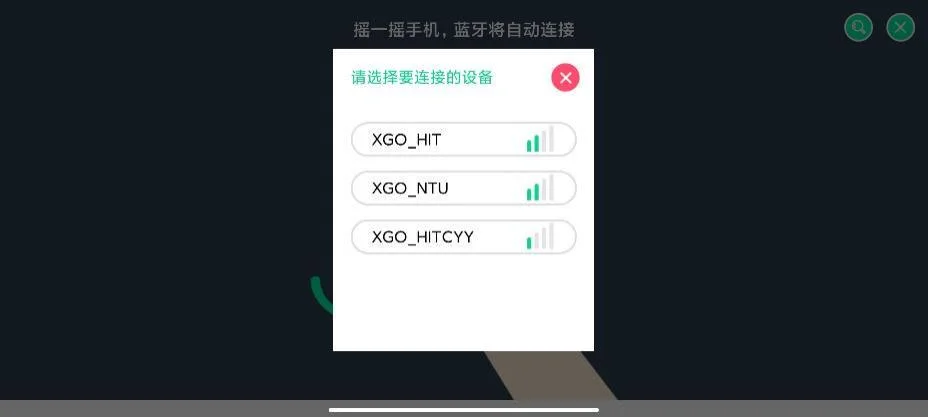
If the robot device has been connected at this time, click the Bluetooth button to pop up the window shown in the figure below, and the user can disconnect the connection.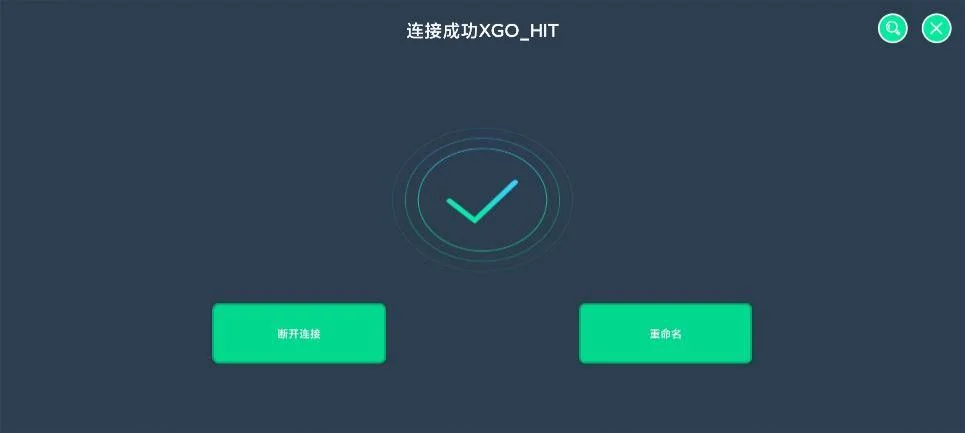
2) Calibration: Click the calibration button to enter the calibration interface to reset the initial position of the robot.After reading carefully, click I know, click to enter the calibration mode button, at this time the robot will no longer output torque, external force can rotate, the user needs to put the robot as the specified position (see the secondary development manual), and then click the complete calibration button, the robot will record the current position as the initial position and automatically complete the restart.
Note: The calibration button is hidden by default in the main interface. The user can cancel the hidden in the Settings interface. See the Settings section for details.This operation is a professional user operation, the operation is irreversible, please read the instructions carefully after the operation.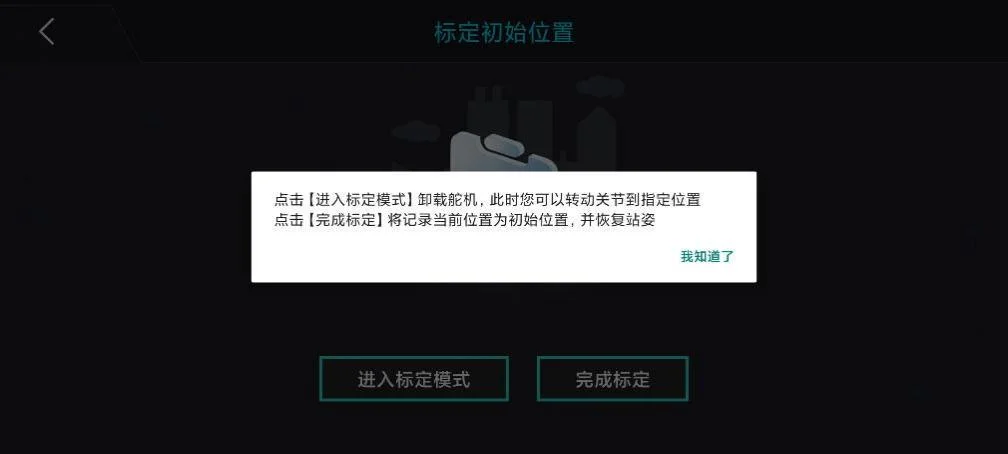
3)Settings: Click the Settings button to enter the Settings interface. As shown in the figure below, users can set “whether the APP will automatically close Bluetooth” and the setting language (currently only Chinese and English)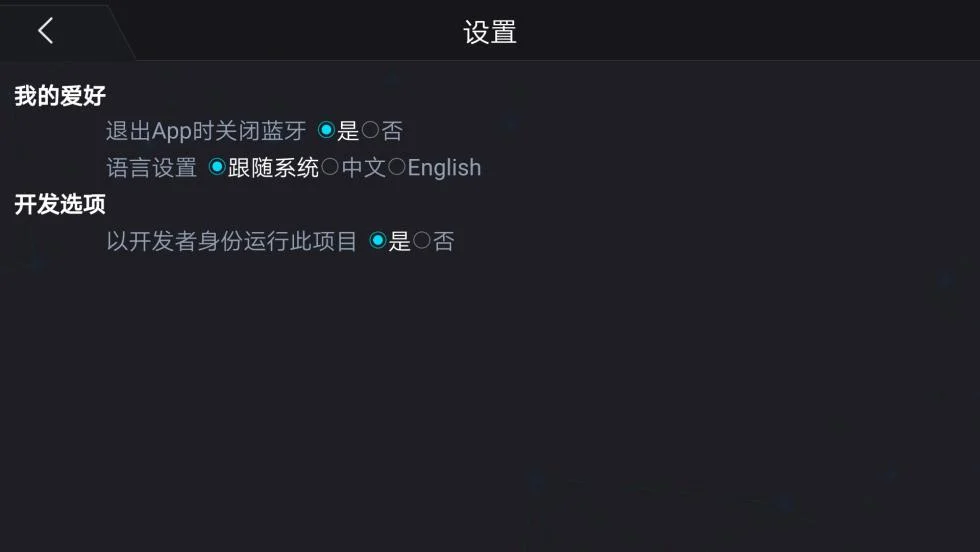
Note When running this project as a developer is selected as an option, the calibration button on the main interface is unhidden.
About: Click the About button to enter the About interface and see more information about this product.
5)Control interface: Click the performance mode, complete machine control, single-leg control and rudder machine control buttons to enter different control interfaces respectively. Slide and switch different modes from left and right in the main page. You can control the connected robot equipment in real time. Please refer to the next section for details.
2.2.Control interface
The control interface enables the user to directly control the robot in different ways, equivalent to the user having multiple remote controls, respectively described as follows: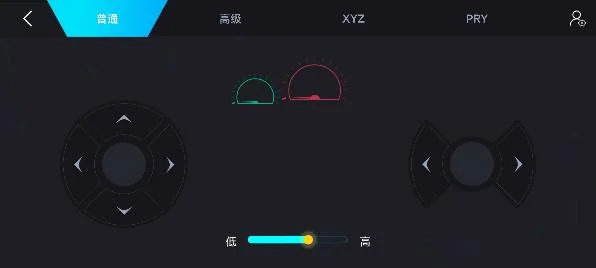
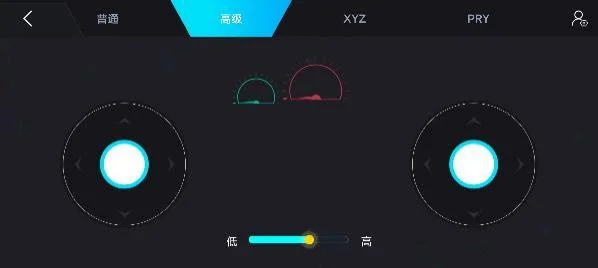
1)Machine control: complete machine control provides four modes of operation. Ordinary users control the movement and rotation of the robot through the button; advanced users control the movement and rotation of the robot through the rocker; XYZ allows users to control the 3D translation of the robot body through the rocker; PRY allows users to control the three-dimensional rotation of the robot body through the rocker.In addition, you can also control the height of the robot by dragging the lower sliding bar, and change the movement mode, open and close the gyroscope by clicking the upper right corner button.The blue dial displays the current device power, with 0 when the device is not connected; the red dial displays the current speed.The top two graphs give the ordinary and advanced interfaces.
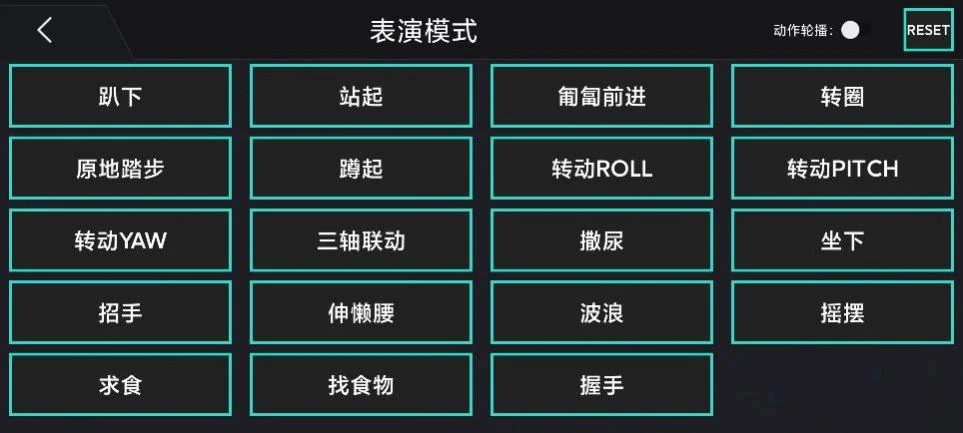
2)Performance mode: the user allows the robot to perform the corresponding actions by clicking each button, click the rotation robot will perform all actions repeatedly, and click the Reset robot will restore the initial state.
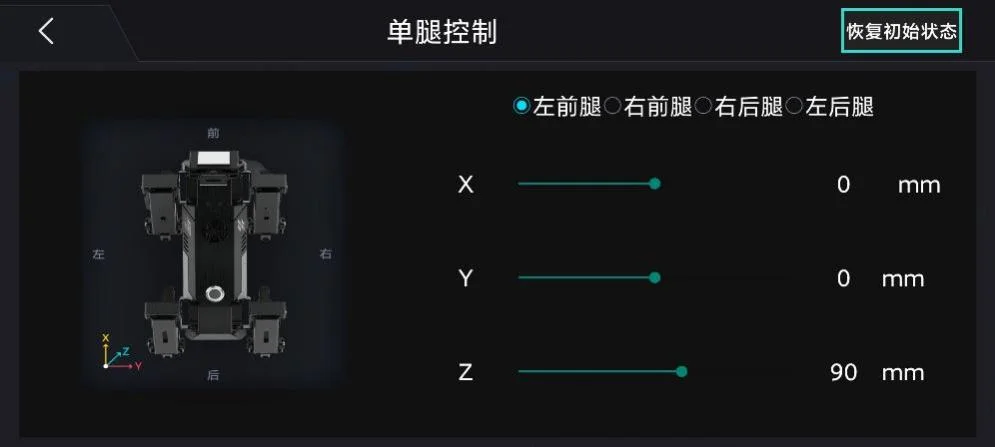
3)Single leg control: The interface allows users to directly control a leg of the robot by changing the three-dimensional coordinate system by selecting the leg to control and then dragging the sliding lever.
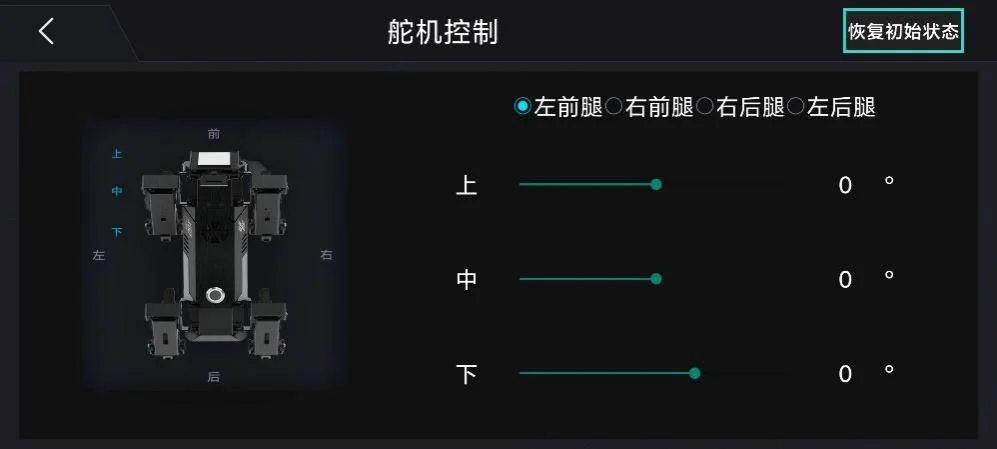
4)Servo control: the interface allows the user to directly control a certain steering machine of the robot, changing the angle of the corresponding steering machine by selecting the position to control the rudder machine and then dragging the sliding lever.
3.Detailed function solution
Example of controlling the robot forward function using a remote control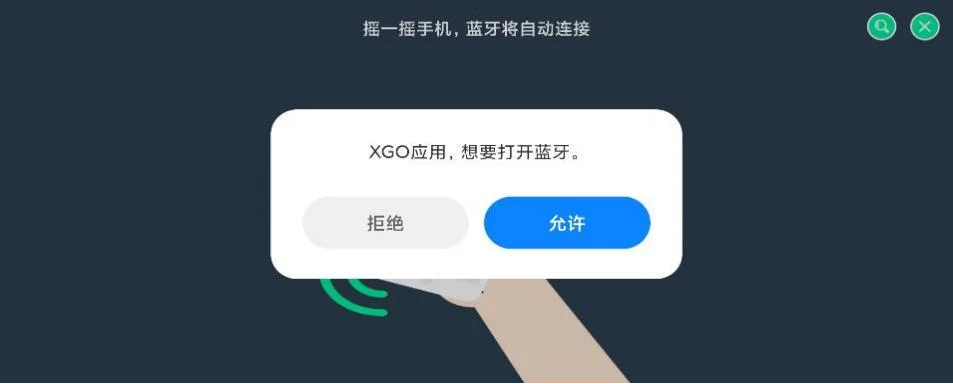
1)Enter the APP, and click the Bluetooth button after entering the main page. As shown in the picture above, click to open Bluetooth, enter the Bluetooth connection interface, and shake the phone. The APP will automatically connect to the robot device and jump to the main interface.
2)After the connection is successful, click the control button of the whole machine to enter the remote control interface. Take the ordinary control mode as an example, click the left upward button, you will see the robot moving forward, release the button and the robot to stop the movement.
3)Click the return button in the top left corner to return to the main interface, and click the Bluetooth button to disconnect.Two consecutive return clicks to exit the APP.
IV PC Terminal
1.Introduction
XGOEdu is a visual building block programming platform developed for XGO.Users can write programs graphically, and they can also read or write Python programs directly.The program can be written and can be executed online or uploaded to the AI module.With the platform, users can enable AI for their projects without networking the hardware.
The platform builds on providing introductory Python syntax (logic, loop, mathematical operations, variables, word processing, list, dictionary, tuples, collection, functions, file operation, time), and also provides different categories of functions related to module programming, such as: serial port input and output, input and output, button / LED lamp control, microphone data acquisition, camera control, audio and video processing, model use (including face recognition, face recognition, face recognition, object recognition, object classifier, handwritten digital recognition).
Users can also train TinyYOLO-based models or MobileNET. After the format conversion through our platform, they will be able to program through the programming platform and run directly on XGO AI module.
2.Method
The XGO-Blockly Graphical Programming Tool is interface-friendly and can be used to learn artificial intelligence, Internet of Things and Python base.This tool allows you to program and upload programs to modules in the AI module.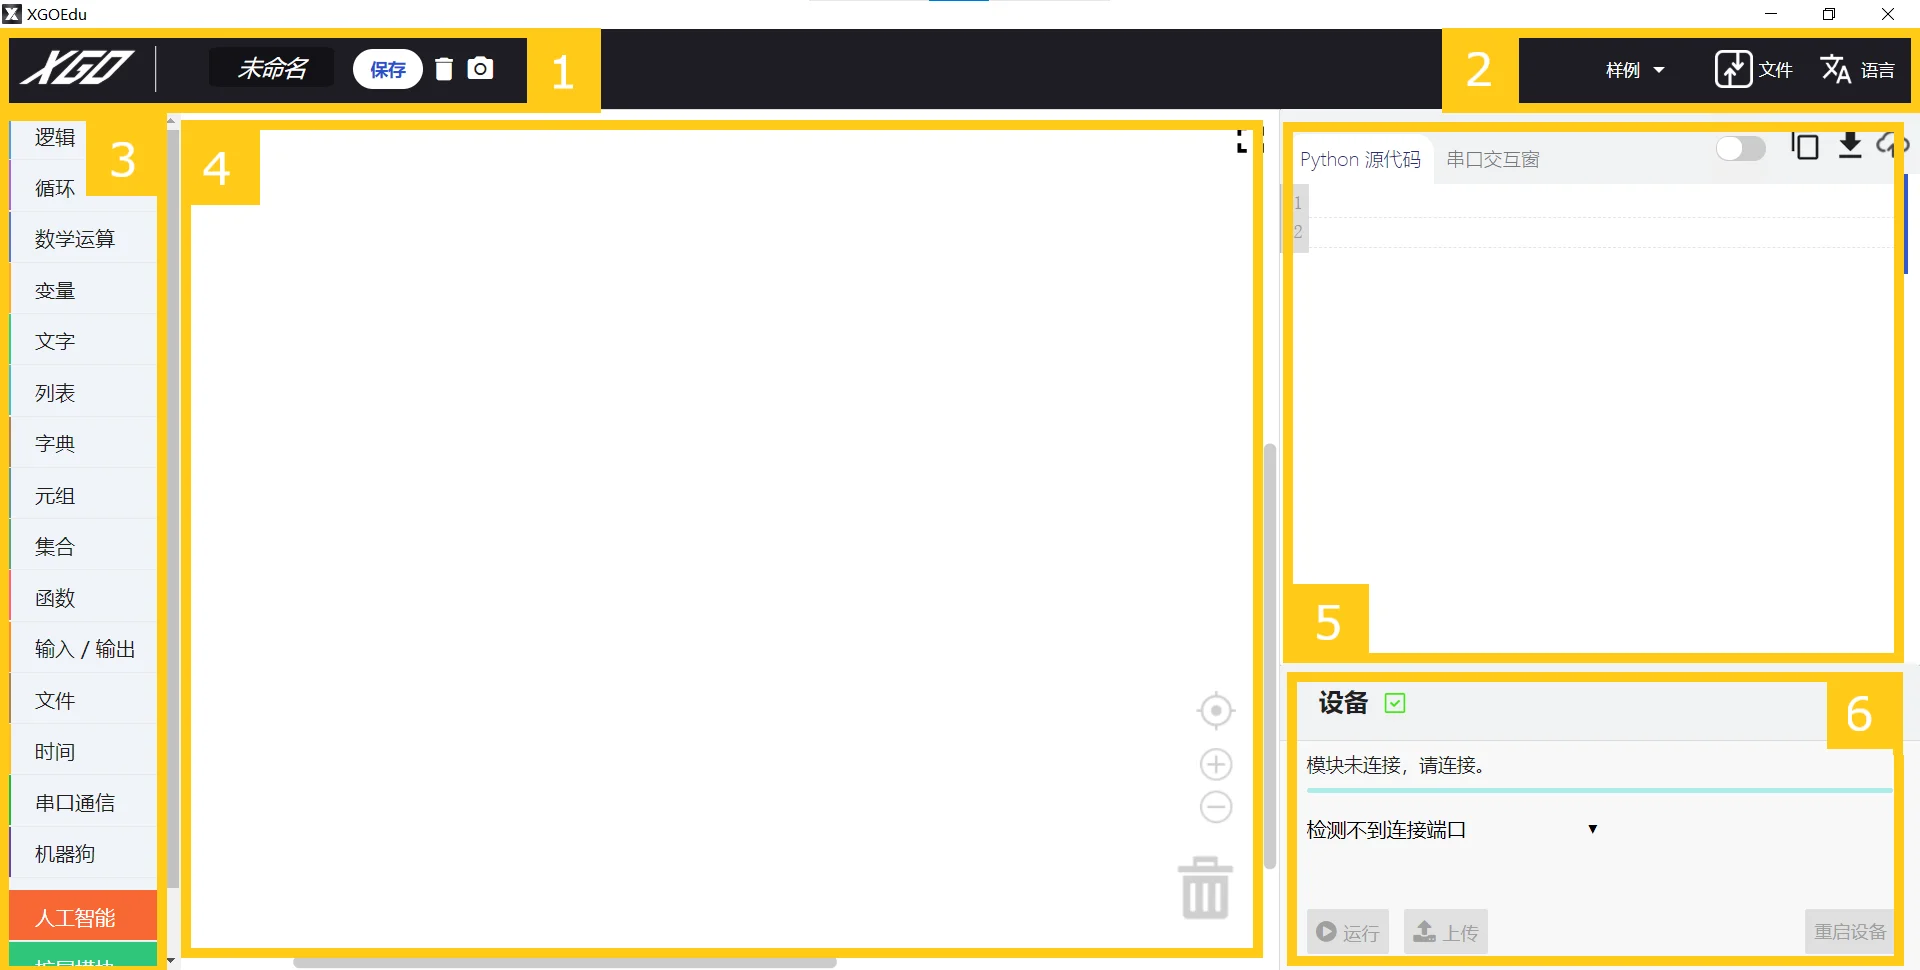
In the figure above, we divide the XGO-Blockly programming interface into six regions:
(1) Document access area: program project named, saved (saved as. xml), delete all blocks and all blocks
(2) Auxiliary area: sample loading, project file import and export, and language setting
(3) Block instruction area: except for the base building blocks (from “logic” to “communication of serial port”), with different expansion building blocks in different modes.
(4) Block: Drag blocks into this area for programming.
(5) Python programming area: When the user drags the blocks into the block programming area, the corresponding Python source code will be generated here to support users to edit, copy, download and upload the code.
(6) Upload area: users can choose to use the wired upload mode.
Programming experience 1: Display the Hello World in the screen module!
First, turn on the XGO-Blockly.
Then connect the module and the computer with the data cable to check whether the upload area shows the green box + pair sign, and the serial port display with the COM + number.
After the two items are guaranteed, you can start programming.
Click the following instructions in the block instruction area and drag them to the block programming area:
(1) Extension module | Screen: “screen initialization”, “create a blank canvas”, “set the canvas coordinates”
(2) Loop: Repeat Always
(3) Extension module | Screen: Screen Text and enter Hello World!”
(4) Extension Module | Screen: Show Canvas
(Text Size can be changed by modifying the number; color optional, select white here)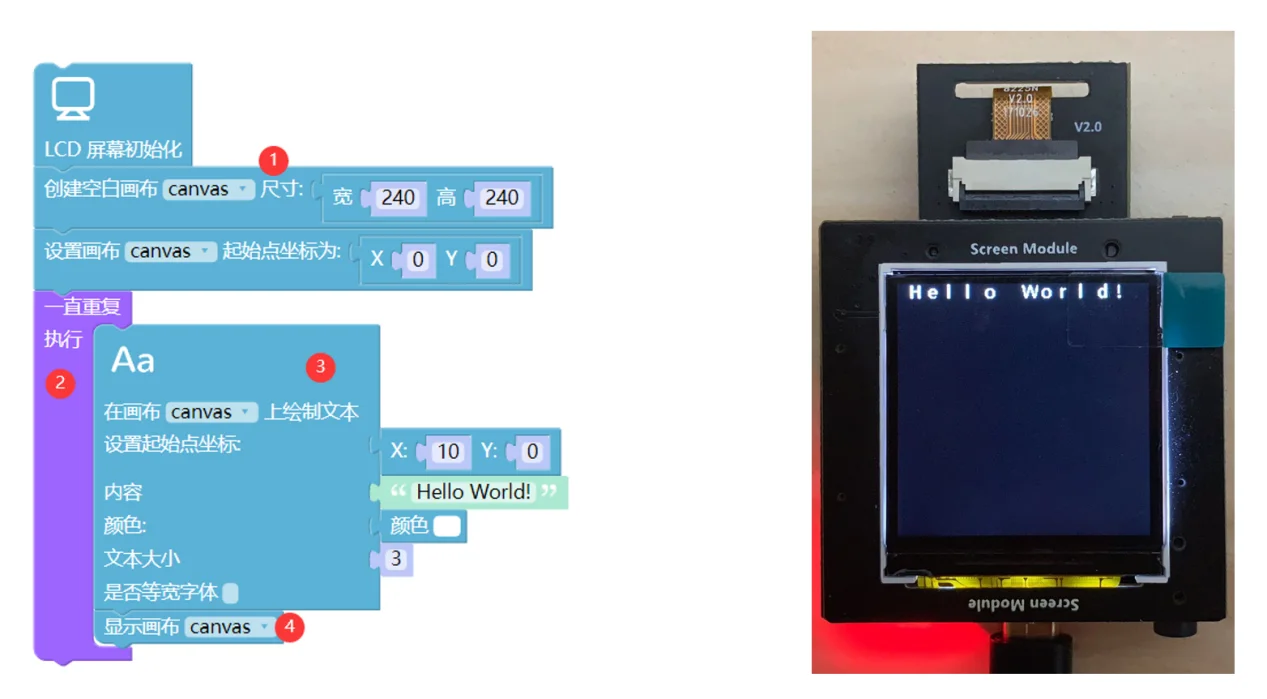
Programming experience 2: XGO mini custom face recognition
First, turn on the XGO-Blockly.
Then connect the module and the computer with the data cable to check whether the upload area shows the green box + pair sign, and the serial port display with the COM + number.
After the two items are guaranteed, you can start programming.
Click the following instructions in the block instruction area and drag them to the block programming area:
(1) Machine dog: “Machine dog initialization”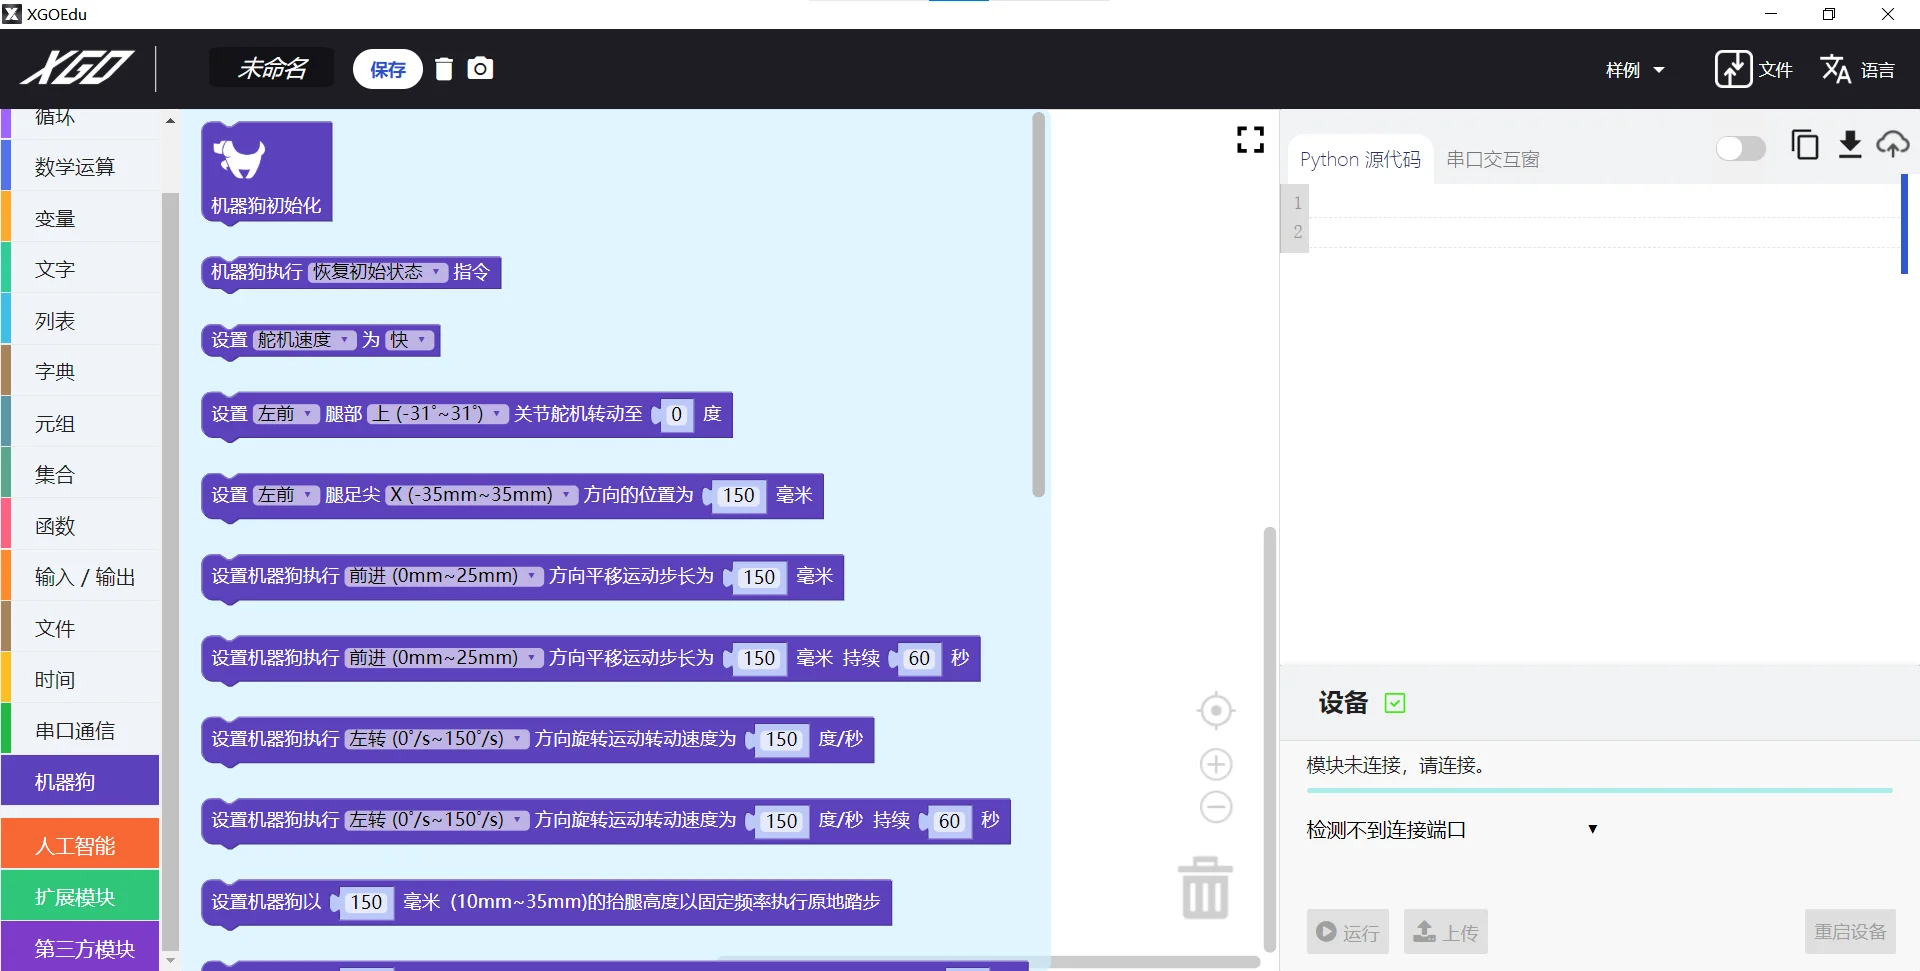
(2) Loop: Repeat Always
(3) Artificial intelligence | AI model: experimental function “custom initialization face recognition model”
(4) Logic: “If” “=”
(5) Text: Fill in Name1
(6) Artificial intelligence | AI model: the experimental function “identified the object of the face model”
(7) Machine dog: “Machine dog execute instruction” selection action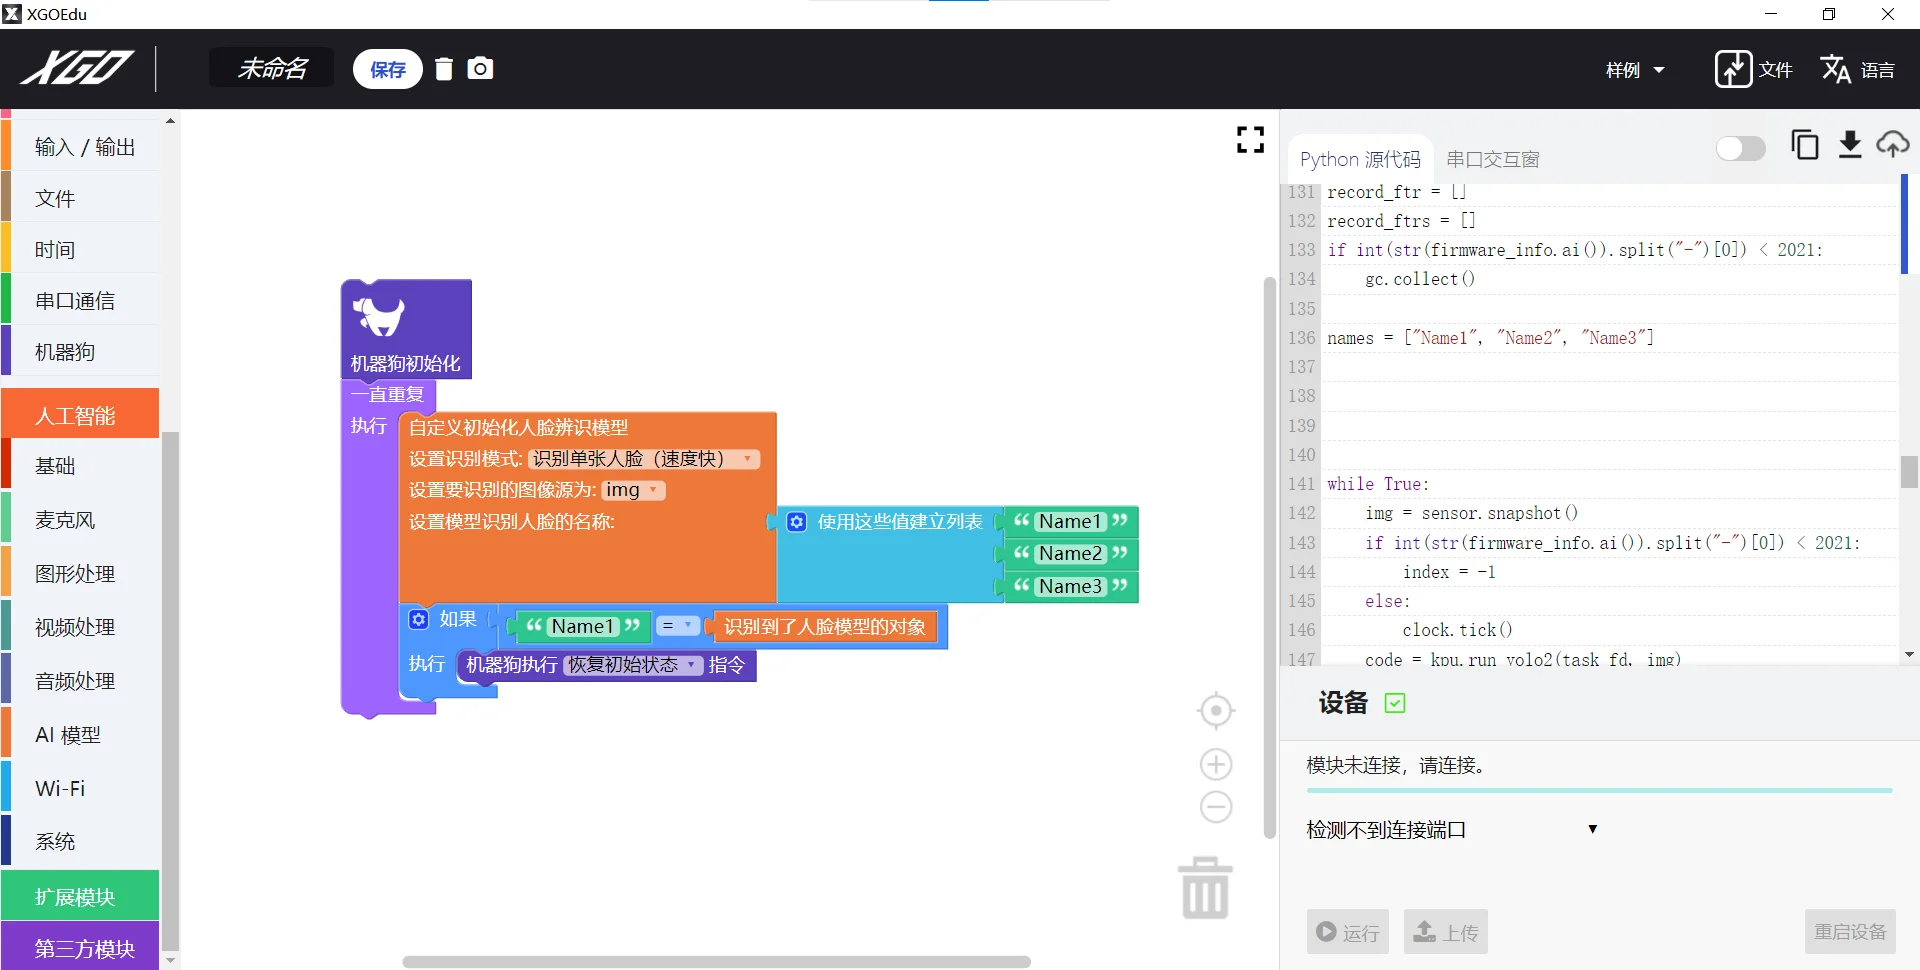
The case is located in Samples-> Machine Dog Case-> Machine Dog-facial recognition
– Consideration –
I Precautions:
1. Unplug the unit if left unused. When charging, always use the specified charger model.
2. This product enclosure is made of metal, be aware of safety in use and avoid finger from getting wounded in motion.
3. Avoid the exposure to humid environment and avoid falling from height.
4. The steering mechanism may be heated after the robot dog moves for a long time, it is considered as normal, but persistent heating may compromise the properties of the steering mechanism, it is advised not to use the unit for a long time.
II Maintenance and Storage:
Note: Turn off the power before starting maintenance
1. Wipe the exposed surface of the robot dog and keep the control board away from water.
2. Check whether the screws become loose and tighten if so.
3. For transportation or storage, use XGO special packaging box to avoid accidental damage; four legs should be securely fixed to avoid friction from vibration.
III Regular Faults and Troubleshooting
|
Fault |
Possible Cause |
Handling |
|
The ON/OFF indicator is unlit after the unit is turned on |
Run out of battery or low level of battery |
Charge with power adapter |
|
The ON/OFF indicator is lit but no action is executed after the unit is turned on |
The control system goes wrong or the system is in calibration mode |
Contact our after-sales service for repair service |
|
The standing posture is seriously offset |
The initial position is offset from the predefined value |
Recalibrate according to special operation notes |
|
A joint has no torque output |
The steering mechanism is damaged |
Contact our after-sales service for repair service |
IV How to update the SD card file
take out the SD card and read the SD card file on the PC through the SD card reader. The general directory is as follows. After the original content is completely cleared, the new content and the directory structure remains unchanged (new content in the SD card).
– XGO-Mini Communication Protocol –
Version: V1.0
Date Issued: 2021/08/05
|
Date |
Reason |
Author |
|
2021/08/05 |
Create and issue document |
Lin Tao |
I Preface
This document applies to the communication protocol for command/data integration between XGO upper host and the robot dog. The communication protocol is based on standard TTL serial communication and features XH2.54 4PIN interface connection.
II Background
XGO-Mini is a desktop-sized AI quadruped robot with 12 DOFs which can achieve omnidirectional movement, 6D posture control, stable posture, and a variety of motions. Equipped with a 9-axis IMU, its joint position sensor and electric current sensor is able to reflect to its own posture and joint rotation angle and torque, which are used for algorithms verification and exploitation.
Unscrew 2 screws on the back, 2 screws on the left and right, and 2 screws at the tail with a hex screwdriver, detach the back panel of the robot dog, unplug the power cord with caution.
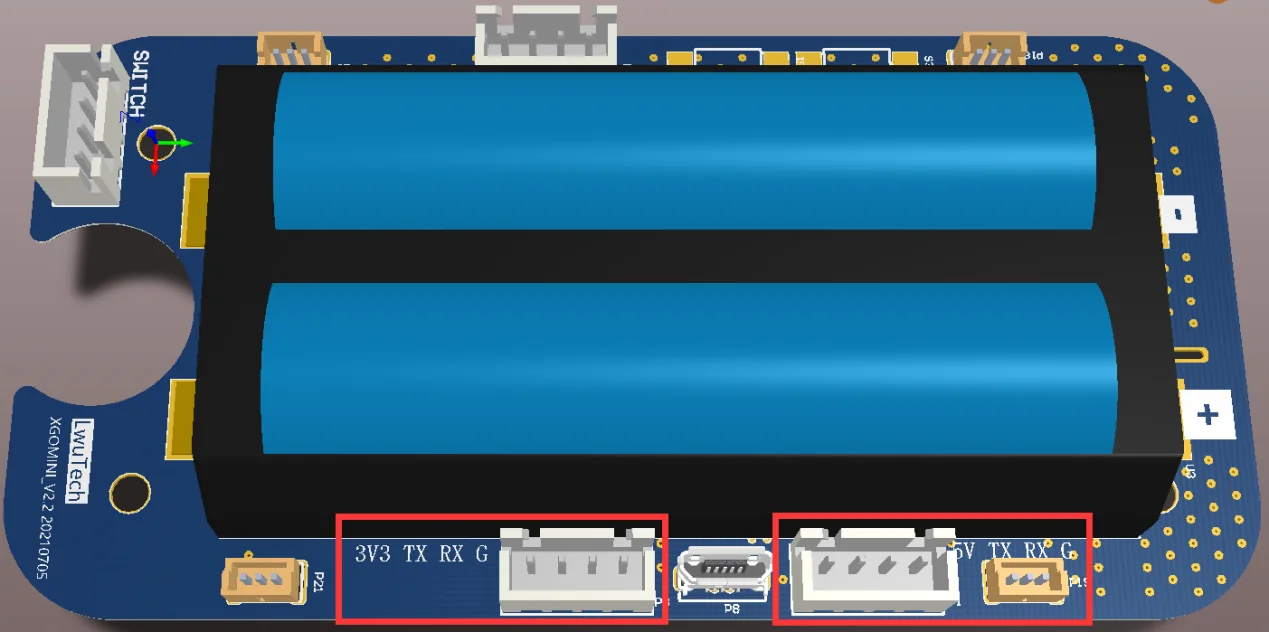
As shown below, there are 2 serial communication interfaces at one side of the motherboard, connect interfaces by the line sequence printed on the motherboard and the host computer, then start the testing procedure. External supply voltage at two terminals is 5V and 3.3V respectively, but both are not allowed to use simultaneously.
In default mode, 3.3V terminal is occupied by the AI module. Unplug the AI module terminal if you intend to use other device for communication.
III Software interface
The fixed format applicable to communication: prefix+message+suffix.
Standard TTL serial communication:
|
Baud rate |
115200 |
|
Data bit |
8 |
|
Stop bit |
1 |
|
Parity bit |
NA |
1. Communication format
|
Prefix |
Length |
Message |
CheckSum |
Suffix |
||
|
0x55 |
0x00 |
0x00 |
0xAA |
|||
|
Bytes occupied by the data packet |
Data |
Check if data is correct |
||||
Prefix:in fixed format
Length:length of data packet = space occupied by prefix [2] + space occupied by length
Message:See 2. Command
CheckSum:CheckSum= ~(Length+Message) If the sum of bytes in the bracket is greater than 255, the byte with the lowest value is taken, vice versa.
Suffix:in fixed format
TIPS:When the local appliance receives a command, if the length or CheckSum goes wrong, then the data is considered to be wrong and the data packet will be automatically discarded.
2.Commands
2.1.Write command, no response (0x00)
|
Prefix |
Length |
Command Type |
First Address |
Data |
CheckSum |
Suffix |
||
|
0x55 |
0x00 |
0x00 |
0xAA |
|||||
|
0x00 |
data1,data2… |
|||||||
Command:0x00,write data of some bytes to MemTable consecutively, no response will be generated
First Address:the first address written in the data packet (more details are available in the protocol MemTable)
Data:data that are written consecutively
Example: set the max. forward movement speed of the robot
0x55 0x00 0x09 0x00 0x30 0xFF 0xC7 0x00 0xAA
Prefix:0x55 0x00
Length:0x09,there are 9 bytes contained in the data packet
Message:0x00 write command with no response, 0x30 register address of forward, backward movement speed, 0xff set the max. speed
CheckSum:0x09+0x00+0x30+0xFF=0x138, take the lowest byte 0x38, take the inverse to get 0xC7
Suffix:0x00 0xAA
2.2.Read command (0x02)
|
Prefix |
Length |
Command |
First Address |
Bytes |
CheckSum |
Suffix |
||
|
0x55 |
0x00 |
0x00 |
0xAA |
|||||
|
0x09 |
0x02 |
|||||||
Command:0x02,a length of consecutive bytes in the read MemTable
First Address:the first address of the data packet that has been read (more details are available in the protocol MemTable)
Bytes:the length of bytes that are read consecutively
Format of the data packet returned:
|
Prefix |
Length |
Response character |
First Address |
Data |
CheckSum |
Suffix |
||
|
0x55 |
0x00 |
0x00 |
0xAA |
|||||
|
0x12 |
||||||||
Response character:0x12, it means this packet is response packet of the read command
First Address:the data that has been read, with the same length as the length of bytes requested by the read command
Data:the data that has been read, with the same length as the length of bytes requested by the read command
Example: read the respective position of 12 steering gears
0x55 0x00 0x09 0x02 0x50 0x0C 0x98 0x00 0xAA
Prefix:0x55 0x00
Length:0x09,there are 9 bytes contained in the data packet
Message:0x02 read command, 0x50 gear ID is the register address at the position “11”, read 12 bytes consecutively
CheckSum:0x09+0x02+0x50+0x0C=0x67, reverse to obtain 0x98
Suffix:0x00 0xAA
Read the packet returned:
0x55 0x00 0x14 0x12 0x50 0x80 0x80 0x80 0x80 0x80 0x80 0x80 0x80 0x80 0x80 0x80 0x80 0x89 0x00 0xAA
Prefix:0x55 0x00
Length:0x14,there are 20 bytes contained in the packet
Message: 0x12 response character, the first address of 0x50 is the same as the corresponding read command, there are 12“0x80” that correspond to the respective address of 12 consecutive registers
CheckSum:0x14+0x12+0x50+0x80*12(d)=0x676, take the byte with the lowest value 0x76, reverse to obtain 0x89
Suffix:0x00 0xAA
3.Robot coordinate system
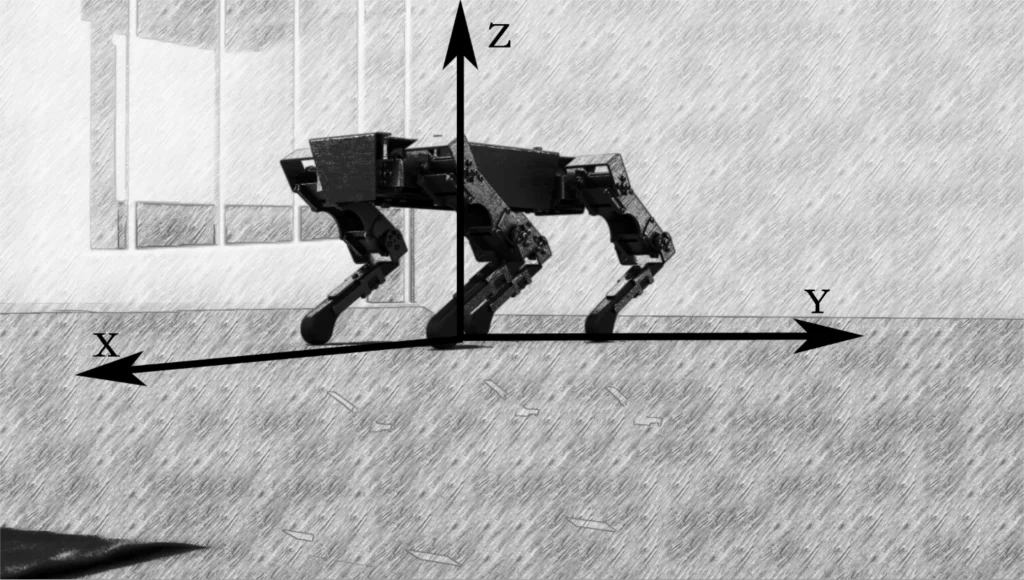
Whole unit coordinate system
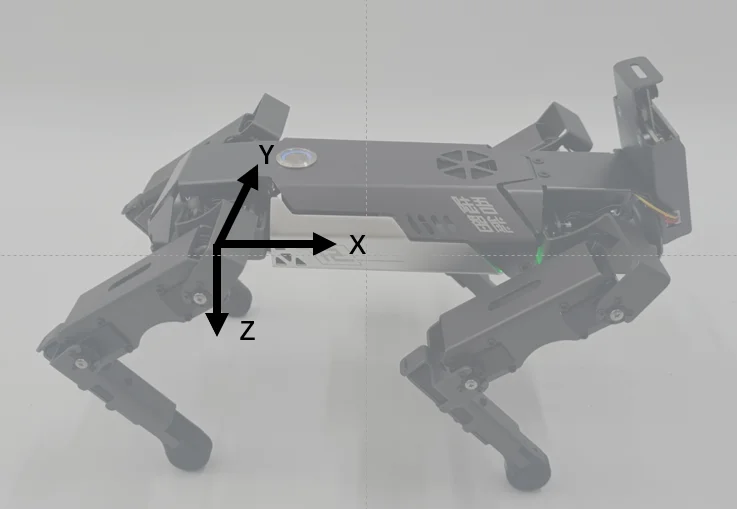
Single leg coordinate system
The MemTable of XGO is given below
Remark: test mode, whole unit mode, single leg mode, steering gear mode (priority level in a descending order): when you try to write any register under the four modes to change data, the robot will enter the mode by default while the register data under other three modes cannot work. The robot is default in whole unit mode.
– The XGOLIB Library –
I XGO Class
All functions are implemented through the method of XGO , requiring a physical interface of the incoming overhead communication with the machine dog when instantiating an XGO class object.Assuming that the serial port communication interface is COM4, the instantiation code is as follows.
|
1 |
dog = XGO(‘COM4’) |
Dog is the object for functional description of the class method.For methods related to pose adjustment and single-leg control, you can view the serial port communication protocol document to understand the robot coordinate system definition.
II Mobile related methods
1.Front and back, left and right translation
move(direction, step)
|
parameter |
form |
input range |
explain |
|
direction |
character |
‘x’、’X’、’y’、’Y’ |
‘x’ or ‘X’ moves the machine dog forward or back, and ‘y’ or ‘Y’ moves the machine dog left or right |
|
step |
figure |
x:[-25,25],y:[-18,18] |
This parameter represents the translation step, depending on direction, positive value represents forward or left, and negative value represents back or right.When the input value exceeds the range, the dog move according to the limit value. |
2.revolve
turn(step)
|
parameter |
form |
input range |
explain |
|
step |
figure |
[-150,150] |
This parameter represents rotational speed in ° / s, positive is left and negative is right. |
3.mark time
mark_time(data)
|
parameter |
form |
input range |
explain |
|
data |
figure |
[10,35] |
This parameter represents the height of leg lift in mm and stop standing when the input is 0 |
4.step frequency
pace(mode)
speed = step frequency x stripe
|
parameter |
form |
input range |
explain |
|
mode |
string |
[‘normal’,’low’,’high’] |
This parameter represents the step frequency, and normal is the default step frequency, low is the slow step frequency, and high is the high-speed step frequency |
5.stop
stop()
|
1 |
demo #The machine dog moves right in 5mm stripe #The next code can be executed normally and will move left at 18mm stripe #The machine dog turns left at 60 ° / s #The machine dog moves at a high-speed pace #The machine dog mark time at the height of 25mm #The machine dog stop make time #Machine dog stop |
A series of methods are encapsulated in the library based on these methods for easy use.
|
Method name |
explain |
|
move_x(step) |
Move front and back, equivalent to move (‘x’, step) |
|
move_y(step) |
Move left to right, equivalent to move (‘y’, step) |
|
forward(step) |
Forward, the equivalent of move (‘x’, abs (step)) |
|
back(step) |
Back, equivalent to move (‘x’, -abs (step)) |
|
left(step) |
Left , equivalent to move (‘y’, abs (step)) |
|
right(step) |
Right , equivalent to move (‘y’, -abs (step)) |
|
turnleft(step) |
Left turn, equivalent to turn (abs (step)) |
|
turnright(step) |
Turn right, equivalent to turn (-abs (step)) |
III Position Methods
When adjusting the position, the foot position of the four legs does not change, and the position or Angle of the body changes.
1.Body position translation
translation(direction, data)
|
parameter |
form |
input range |
explain |
|
direction |
Single-character or character list |
‘x’, ‘y’, ‘z’, or a list containing the above values |
‘x’ represents forward and backward translation, ‘y’ represents left and right translation, and ‘z’ represents height |
|
data |
figure |
x:[-35,35],y:[-18,18],z:[75,115] |
This parameter represents the body position translation distance in mm |
2.Body posture adjustment
attitude(direction, data)
|
parameter |
form |
input range |
explain |
|
direction |
Single-character or character list |
‘r’, ‘p’, ‘y’, or a list containing the above values |
‘r’ represents the roll , ‘p’ is the pitch and ‘y’ is the yaw |
|
data |
figure |
r:[-20,20],p:[-15,15],y:[11,11] |
This parameter represents the magnitude of the body pose adjustment in ° |
3.Body cycle translation
periodic_tran(direction, period)
the body will be reciprocated in the specified period and direction by half the position translation limit, allowing periodic movements in multiple directions simultaneously.Body cycle movement and the whole machine movement cannot be carried out at the same time.
|
parameter |
form |
input range |
explain |
|
direction |
Single character or character list |
‘x’, ‘y’, ‘z’, or a list containing the above values |
‘x’ represents forward and backward translation, ‘y’ represents left and right translation, and ‘z’ represents height |
|
period |
figure |
[1.5,8] |
This parameter represents the motion cycle in second; entering 0 represents the stop movement |
4.Body cycle rotation
periodic_rot(direction, period)
|
parameter |
form |
input range |
explain |
|
direction |
Single character or character list |
‘r’, ‘p’, ‘y’, or a list containing the above values |
‘r’ represents the roll , ‘p’is the pitch and ‘y’ is the yaw |
|
period |
figure |
[1.5,8] |
This parameter represents the motion cycle in second; entering 0 represents the stop movement |
|
1 |
demo #The body translate10mm to the right and height set to 100mm #The body pitch angle was set to 10 °, yaw angle set to-4 ° and roll angle set to 8 ° #The body was operated in a 3s cycle, with forward and backward translation #The body was reciprocated at a 3s cycle and at a yaw angle at a 7.4s cycle #Stop the reciprocation of the yaw angle |
IV The rest methods
1.Restore the initial state
reset()
stops all movements, and all states return to the initial state
2.Set the self-stabilization
imu(mode)
When self-stable , the machine dog will automatically adjust the attitude angle to keep the back in a horizontal position, and must not manually set the attitude angle when turned on.
|
parameter |
form |
input range |
explain |
|
mode |
integer |
0、1 |
0 Represents closed, and 1 represents open |
3.Single Leg
leg(leg_id, data) controls the foot position of the specified leg
|
parameter |
form |
input range |
explain |
|
leg_id |
integer |
1、2、3、4 |
They represent the left front, right front, right rear and left rear |
|
data |
List of numbers of length 3 |
x:[-35,35],y:[-18,18],z:[75,115] |
This parameter represents the foot position in mm |
|
1 |
Demo |
4.Servo Control
motor(motor_id, data)
controls the rotation angle of the Servo
|
parameter |
form |
input range |
explain |
|
motor_id |
List of integer or integers |
[11,12,13,21,22,23,31,32,33,41,42,43] |
The first number 1,2,3,4 stand for left front , right front ,right rear ,left rear. |
|
The second number 1,2,3 stand for down ,middle and upper Servo |
|||
|
data |
List of numbers or numbers |
Down: [-65,73], Middle: [-66,93], Upper: [-31,31] |
This parameter represents the foot position in ° |
|
1 |
demo #Set the rotation angle of the upper right front leg at 10 ° and the down left rear leg at-20 ° |
5.Uninstall the single leg Servo
unload_motor(leg_id)
unload three Servo on one leg without output torque, which can be rotate by hand, generally used for writing actions
|
parameter |
form |
input range |
explain |
|
leg_id |
integer |
1,2,3,4 |
They represent the left front, right front, right rear and left rear |
6.All Servo are uninstalled
unload_allmotor()
makes all Servo unloaded without output torque and can be turned by hand
7.Single leg Servo loading
load_motor(leg_id)
keeps the three Servo on one leg in current position, output the torque, which can not be rotated by hand, and is generally used for writing actions
|
parameter |
form |
input range |
explain |
|
leg_id |
integer |
1,2,3,4 |
They represent the left front, right front, right rear and left rear |
8.All Servo are loaded
load_allmotor()
keeps all Servo in current position, output torque which can not be turned by hand
9.Set the Servo rotation speed
motor_speed(speed)
adjusts the rotation speed of the Servo for separate control
|
parameter |
form |
input range |
explain |
|
speed |
integer |
[1,255] |
0 At the lowest speed and 255 at the highest speed |
10.Perform a preset action
action(action_id)
|
parameter |
form |
input range |
explain |
|
action_id |
integer |
[1,255] |
The ID and action correspondence is shown in the table below |
|
ID |
Action |
ID |
Action |
ID |
Action |
|
1 |
fall |
2 |
stand |
3 |
crawling |
|
4 |
circle |
5 |
Mark time |
6 |
Squat up |
|
7 |
turn Roll |
8 |
turn Pitch |
9 |
turn Yaw |
|
10 |
Three-axis rotation |
11 |
piss |
12 |
sit down |
|
13 |
beckon |
14 |
stretch oneself |
15 |
wave |
|
16 |
vacillate to the left and right |
17 |
For food |
18 |
Find food |
|
19 |
shake hands |
20 |
pay a New Year call |
V Read methods
Read the Servo
read_motor()
read 12 Servos, returns a list 12 servos ,if failed returns an empty list
Read the battery
read_battery()
read_battery() ,read the current battery power , returns an integer of 1-100 percentage, if failed return 0.











Reviews
There are no reviews yet.